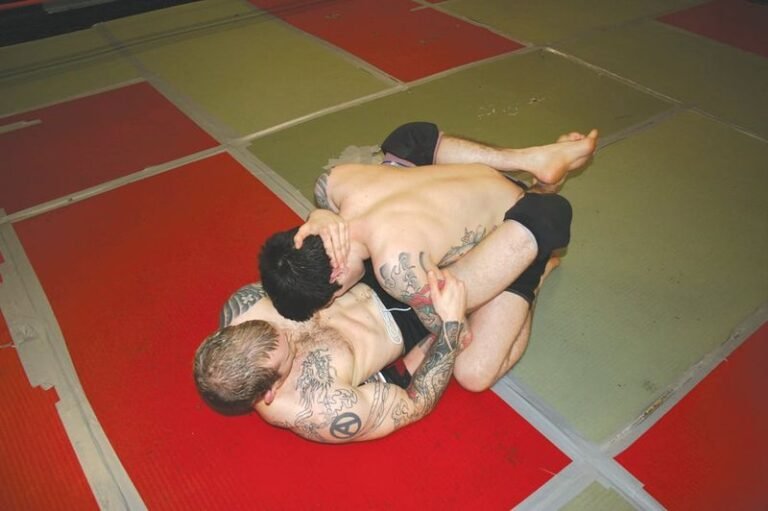

Bicep Slicer No-Gi: 5 Setups That Actually Work in Competition
Most grapplers spend real training time learning to defend the armbar. They clasp their hands, pull the elbow in, and wait for the attacker to give up. The problem is that this defense — the most common one taught — puts the arm in exactly the position the bicep slicer needs. The submission catches people not because they don’t know the armbar defense, but because they never learned what comes next.

What the Bicep Slicer Actually Does
This is not a joint lock. You are not hyperextending the elbow or rotating the shoulder out of socket — you are compressing the bicep muscle and the soft tissue around the elbow crease against a bony surface. The pain arrives fast and does not let up. Unlike an armbar, where the defender has a few seconds to clasp hands and stall for a referee standup, a properly set bicep slicer tightens as the defender pulls back.
The fulcrum in no-gi is your forearm bone, your wrist, or your knee. You fold the opponent’s arm across it at the elbow crease, then lock the configuration with a body scissor or wrist grip. The finish comes from pulling their wrist toward your shoulder while the fulcrum drives through the bend — not from squeezing the arm toward you, which kills the leverage. The moment the arm folds tight across the lever point, pressure builds on the bicep and the tendons connecting at the inner elbow.
The reason it surfaces more in no-gi than most people expect: without sleeve grips to control the arm, grapplers on the bottom tend to post with bent arms far more often. That bent arm — used as a frame against your chest or hip — is a bicep slicer waiting to be set.

Bicep Slicer Legality in No-Gi Competition
Competition rules vary here, and the difference is significant.
Under IBJJF no-gi rules, the bicep slicer is legal only at brown belt and above — the same restriction that applies in the gi. Using it below that level results in disqualification. The IBJJF’s stated reasoning is that it targets muscle tissue rather than a joint, which makes the injury threshold harder to predict. A brown or black belt is expected to recognize the submission early and tap accordingly.
ADCC has no such restriction. The technique is fully legal at all divisions regardless of experience level. The same applies to EBI, Grappling Industries, NAGA at most competitive divisions, UFC BJJ, and the growing circuit of submission-only events that now runs year-round. If you compete at anything other than IBJJF, start learning it now.
One practical note regardless of ruleset: the tap from a bicep slicer comes fast — faster than most joint locks — because there is no slow ramp-up of pressure. In training, grip your partner’s wrist firmly before applying force and release the instant they tap. Do not wait to “feel” the tap through the wrist. Watch for it.
5 Bicep Slicer Setups That Work in No-Gi
The technique shows up across multiple positions. These five are the most consistent entries in no-gi grappling, starting with the one that finishes most often at competitive level.
1. The Armbar Counter
You have the armbar. Your opponent defends by clasping their hands, bending the arm, and driving the elbow toward their body to prevent extension. This is the most common armbar defense at every level of competition, and it sets up the bicep slicer directly.
Instead of fighting to extend the arm, let them bend it. Place your forearm behind the elbow crease on the inside of the arm, then swing your hips away from their body. This hip movement creates the folding pressure rather than requiring you to squeeze with your arms. Their clasped hands are now preventing them from pulling the arm free. Scissor their wrist with your near leg, and the defense that was saving them from the armbar finishes them with the slicer. The transition is fast enough that the opponent often doesn’t register the submission change before it’s already tight.
2. From Mount, Same-Side Arm
You’re in mount. Your opponent reaches with their near arm to frame on your hip or push on your knee — a standard defensive posture. Their arm is often bent at the elbow, pointed toward the mat. Catch that arm with your forearm across the crook, load your forearm into the bend, and fall to that side while keeping your legs locked around their waist. The weight of your own body drives the compression. Unlike the armbar counter, this goes directly to the finish without a transition. Opponents who are focused on escaping mount via bridge and roll or elbow-knee escape often give up the near arm without realizing it.
3. From Side Control, Near-Arm Trap
Your opponent is on the bottom in side control and posts their near arm against your chest to create space and prevent you from advancing to mount. Instead of clearing the frame, accept it. Trap that arm with your near arm, drive your hip across the elbow crease, and roll toward their head side while keeping the arm folded against your body. Your far arm reaches around their wrist to lock the figure-four. The key timing: it works best when the opponent pushes hard into you, because the resistance accelerates the fold. If they go limp in side control, the arm usually straightens and the entry closes.
4. From Half Guard Top, During the Pass
You’re passing half guard with a knee slice and your opponent frames with a bent arm to slow the pass through. Instead of clearing that frame — which is often the instinct — load your forearm across the elbow crook as you continue the knee slice. As your knee slides through, the passing motion itself applies the slicer pressure. Some grapplers finish this and the opponent doesn’t register what happened; they feel the bicep compress mid-scramble and tap before the pass even completes. Practice the timing in positional rounds specifically — the window opens for a beat and then closes as the pass finishes.
5. Double Wrist Control Entry
From a neutral position — broken guard, clinch, or standing pummeling — control both of your opponent’s wrists. Step to one side so you have positioning behind one of their elbows. Fold that arm across your forearm and use a body drop to take them face-down. With both wrists controlled and the arm folded, the finish applies from a top position without needing mount or side control first. Coach Daniel Wanderley has demonstrated this as a high-percentage back control entry as well, where double wrist control from the back naturally creates the folding position needed to set the slicer.
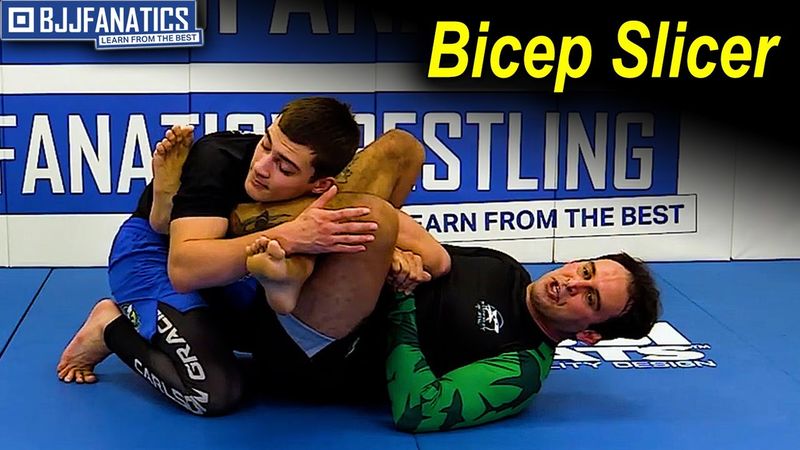
How to Finish the Bicep Slicer in No-Gi
All five setups above require the same finish mechanics. The angle matters more than the strength.
Your forearm or knee acts as the lever at the elbow crease. Drive that lever through the bend rather than pulling the arm toward you. Simultaneously pull the opponent’s wrist toward your shoulder — this folds the arm tighter across the fulcrum. If you feel yourself squeezing the arm against your chest instead of creating the fold, you have lost the angle and the technique stalls. Reset the lever point before they escape.
In no-gi, sweat makes grip retention harder than in the gi. Body weight beats hand strength here. Shift your weight onto the trapped arm — chest or hip pressure — rather than trying to hold it with your fingers. The weight maintains control through the finish even when grips slip.
The tap tends to come earlier than with joint locks. Do not let the speed surprise you. Release immediately, even if it feels like the submission just started settling in. This is especially true during training — the muscle compression accumulates damage faster than the defender expects, and slow releases cause preventable injuries.
Defense and Escapes
One rule governs the escape: straighten the arm before the lock sets.
The moment you feel your arm being folded and a forearm or knee pressing into the elbow crease, drive the arm straight. An extended arm cannot be sliced — the fulcrum has nothing to press against. This is the same reason the armbar counter setup works so well: people have been trained to bend the arm to defend armbars, which is exactly the wrong response when the slicer is the follow-up.
If the arm is already folded and the wrist is being controlled, try rotating your shoulder toward the mat — turning into your opponent. This can shift the lever point off the crook and sometimes creates enough space to pull the arm free. It is not reliable once the submission is tight, but it closes the gap during the first second of setup.
The best long-term defense is learning to escape armbars without the clasped-hand pull-back. Bridge-and-roll escapes, elbow drives, and posture breaks all defend the armbar without creating the bent-arm position the slicer feeds on.

Adding It to Your No-Gi Game
The bicep slicer works best as a secondary threat. Your primary attack is still the armbar — the slicer catches people when they defend it correctly. You are not building a standalone game around it; you are adding a counter to the most common armbar defense, which transforms that defense from a stalling tool into a liability.
If you already train the calf slicer — the lower-body equivalent — the mechanics transfer directly. Same folding principle, same lever-point concept, same emphasis on body weight over grip strength. Grapplers who pick up the calf slicer quickly tend to pick this up at the same pace.
Start drilling the armbar counter in positional sparring. Once you can reach the fold consistently from an opponent’s armbar defense, the mount and side control variations become clearer because you understand what the locked position should feel like. The double wrist and half guard setups take longer to time correctly but reward the investment.
This submission won’t appear in every roll. But the opponent who has been defending your armbars well all training won’t expect it — and the counter that comes directly from their best defense is the hardest thing to stop.
Sources
- Bicep Slicer Submission — Legal and Dangerous — BJJ World: mechanics, setups, and legality overview.
- What Is the Bicep Slicer Submission in BJJ? — Evolve MMA: positions and competition rule breakdown.
- Are Bicep Slicers Illegal in BJJ? — BJJ Fanatics: IBJJF, ADCC, and Grappling Industries rule comparison.