Kimura BJJ: 7 No-Gi Setups That Force the Tap
The kimura BJJ submission is the most-used shoulder lock in no-gi grappling — a figure-four wristlock that turns into a control system, a back-take, and a sweep, often before the opponent realizes which threat is real. It works because the grip itself is the position: once you’ve laced the figure-four, you own the elbow, the shoulder, and a meaningful portion of your opponent’s hips. Drysdale Jiu-Jitsu’s competition data puts the kimura inside the top six no-gi finishes across IBJJF, ADCC, WNO, and Polaris between 2022 and 2024, with closer to 1-in-6 success rates at ADCC 2022 specifically. Most grapplers learn it as a single arm attack and stop there. The truth is, treating the kimura as a position — not a tap — is what separates the people who land it from the people who keep losing it to the bridge-and-roll counter.
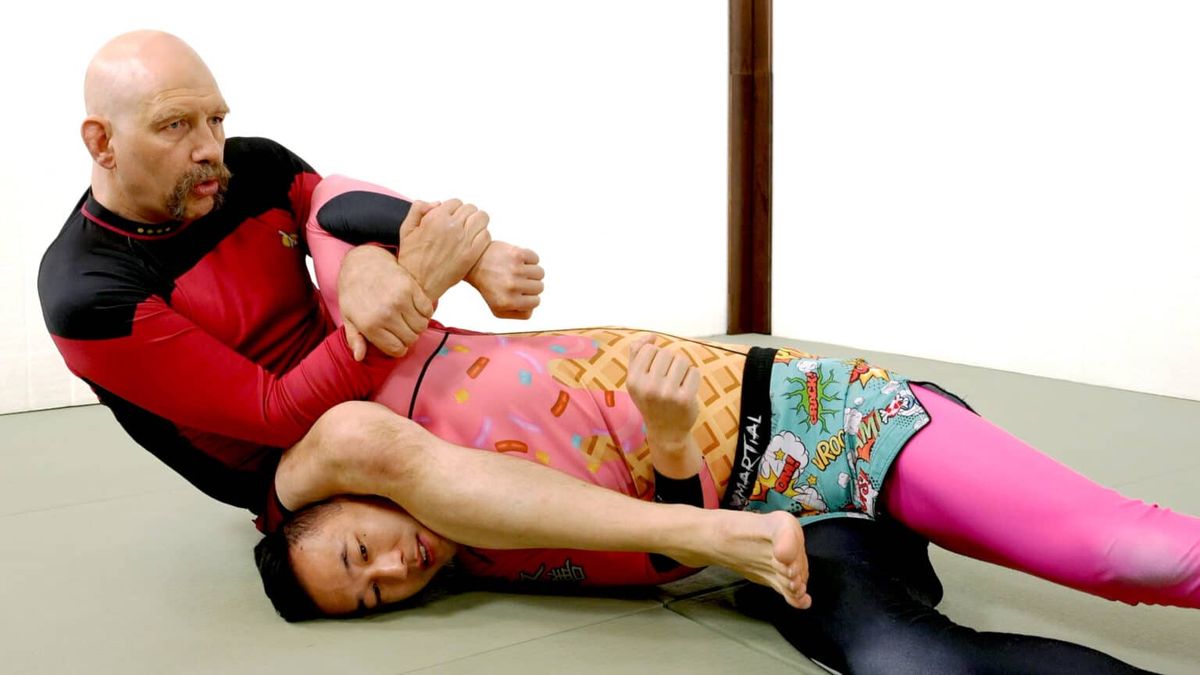
The Kimura BJJ Grip — Why the Figure-Four Wins No-Gi
The figure-four grip is what makes the kimura lock so reliable without a sleeve to anchor against. Your near hand grabs the opponent’s wrist, your far hand threads under their tricep and grips your own wrist — same side meets same side. That closed loop converts your two arms into a single mechanical lever pivoting on the opponent’s shoulder joint.
In no-gi, the grip has to be tighter than gi practitioners are used to. Without fabric friction, slick skin and sweat let the wrist slip if your pinky isn’t crushing down. John Danaher’s framing of a “pull-dominant” kimura is the right one — the hand on the wrist pulls toward your hip while the threaded hand pushes the elbow away. The push hand sets the pin. The pull hand does the actual breaking. Get those roles mixed up and you’ll feel the submission slip even when the figure-four looks correct.
Setup 1: Kimura BJJ From Closed Guard
The kimura from guard works when the opponent posts a hand on the mat to balance — typically the moment they posture up to start passing. You overhook the posted arm, sit up on a 45-degree angle to break the chain of your own hips from theirs, then thread your free hand under their bicep to lock the figure-four.
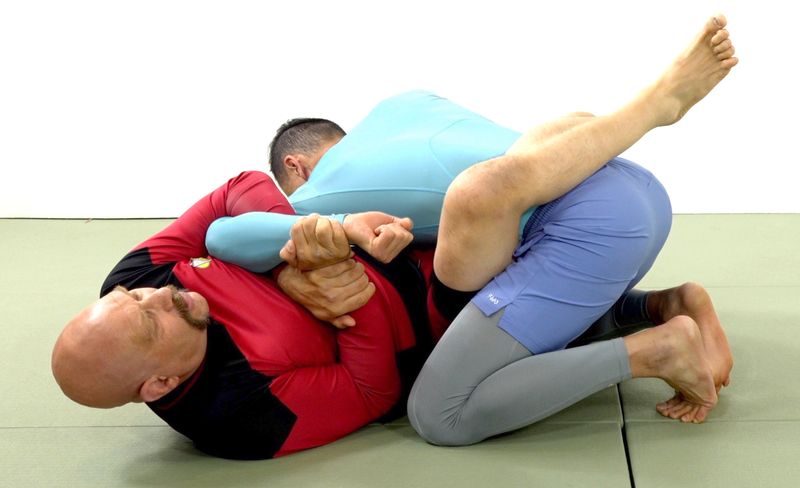
The finish almost never happens flat on your back. You have to rotate to your side, drag the trapped elbow across the opponent’s centerline, and then walk your hips out to create the angle. Marcelo Garcia’s old Renzo Gracie camp footage shows this rotation as a non-negotiable — flat-back kimuras from guard tap white belts and lose to anyone with hip mobility. If they hide the elbow by lying flat, transition to a hip bump sweep or an armbar instead of forcing the lock.
Setup 2: Kimura BJJ From Bottom Half Guard
Bottom half guard is the no-gi position where the kimura works hardest as a complete system, not just a submission. The setup: as your opponent pressures down, you frame on their far shoulder, underhook their near arm, and reach over the top to feed the wrist into a figure-four. This is the entry Lachlan Giles used to dominate at EBI 5 and built out across his eight-volume Kimura Anthology.
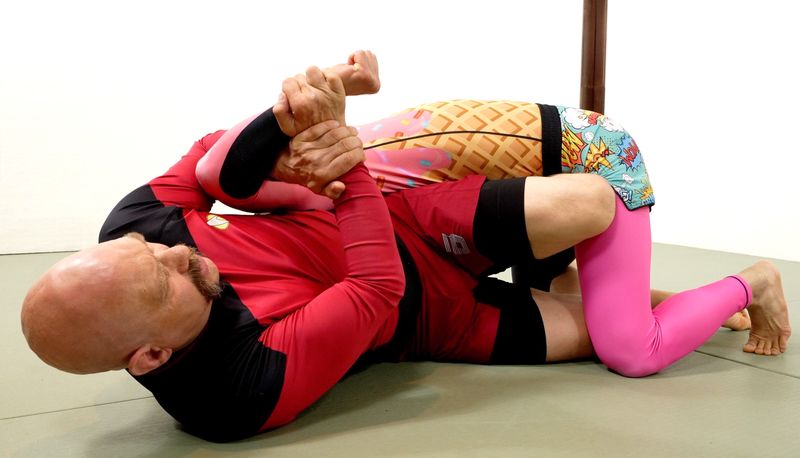
The submission rarely finishes from underneath. What usually happens is the opponent fights the grip and exposes either their back, an armbar, or a sweep angle. That’s the kimura trap. You’re not chasing the tap from bottom — you’re chasing the position the opponent gives up while defending. Read enough of Giles’ breakdowns and you’ll see he treats the figure-four like a leash. The opponent runs, you go with them, and whichever exit they pick becomes your next attack.
Setup 3: Kimura BJJ From Top Half Guard
Most grapplers know top half guard as a passing position. They miss the kimura that’s sitting right there. When the bottom player shrimps and reaches across to frame, that reaching arm becomes a free figure-four if you commit before they retract it.
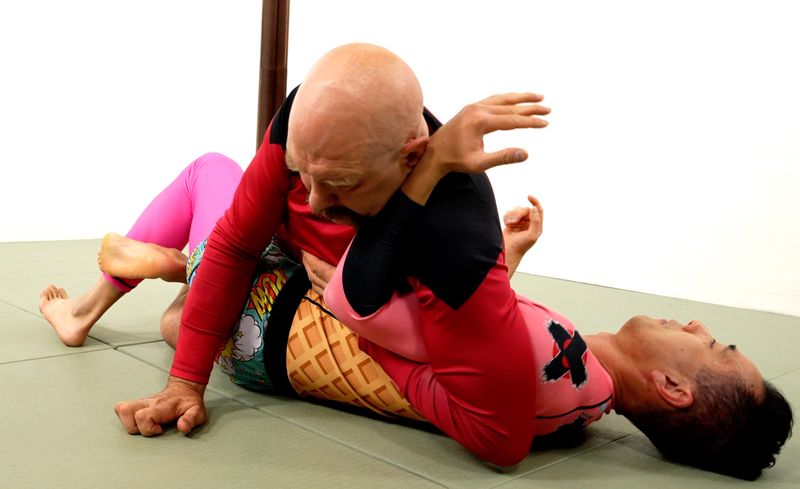
From top half, you have to choose: pass or attack. Going for the kimura usually means giving up the pass, because finishing requires you to swing your trapped leg free and step over to north-south. Done right, you skip a guard pass entirely and land in a north-south kimura with the submission already in place. Done wrong, you cough up the position and end up in deep half. Pick this attack against opponents who frame heavily and rely on their reach to recover guard.
Setup 4: Kimura BJJ From Side Control
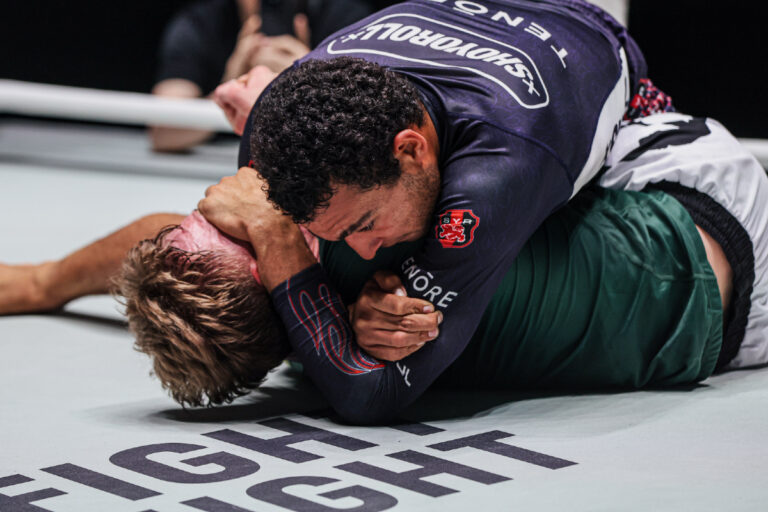
The kimura from side control is the version most people learn first, and most people execute wrong. The error is reaching across the body before pinning the elbow. The fix is sequence: first kill the near arm by stuffing the bicep into the opponent’s ribs with your hip, then trap the wrist with your far hand, then thread for the figure-four.
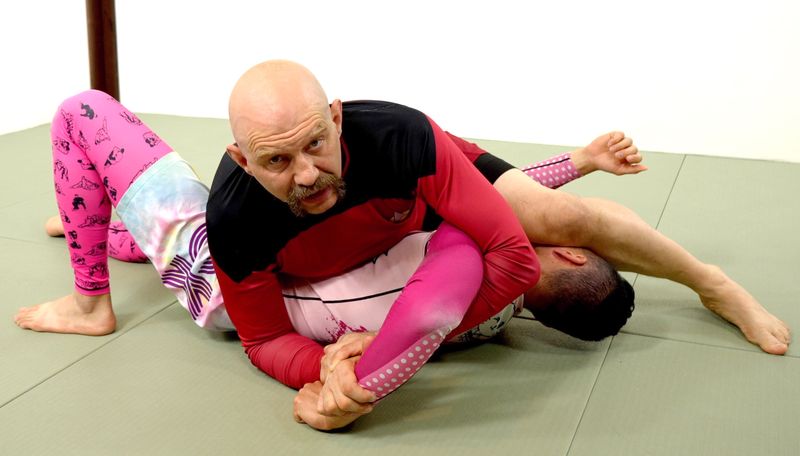
Danaher’s “power line” concept matters most here. Once the grip is locked, you need to rotate your hips toward the opponent’s far hip and your shoulders toward their head, generating tension along a diagonal axis. Without that rotation you’re trying to crank a shoulder with arm strength alone — and a strong opponent will simply straighten the arm and force you into an armbar attempt instead. Side control kimuras die when the attacker stays square. They finish when the attacker turns into the lock at the same time the opponent tries to bridge out.
Setup 5: Kimura BJJ From North-South
North-south is the highest-percentage no-gi kimura position outside of the bottom half guard trap. The opponent’s arms are already exposed and their hip mobility is cut in half by your chest pressure. You overhook the arm closest to you, walk your knees toward their ear, and pull the wrist back toward your hip while your second hand grips through.
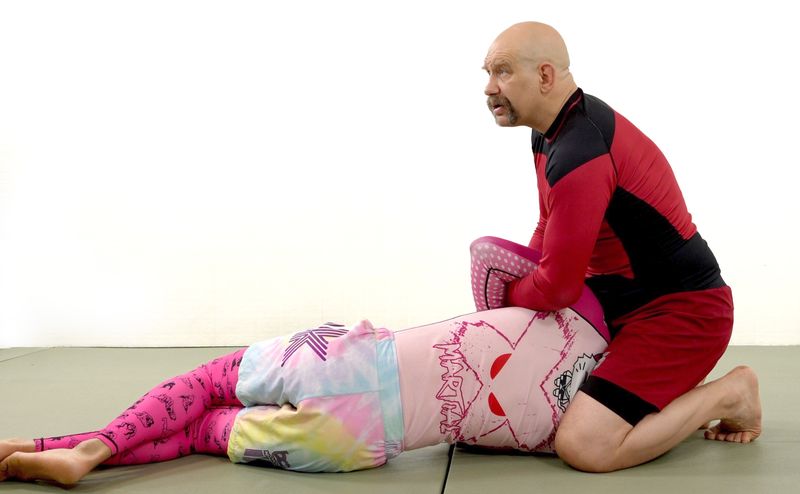
What makes this work in no-gi specifically is that the opponent can’t grip your collar to defend frame the way a gi player would. They have to underhook your leg or wrist-fight, both of which open a path to the kimura grip. If they straighten the arm to defend, you transition to a north-south choke — the two attacks share enough setup that switching mid-attack feels seamless once you’ve drilled the link.
Setup 6: Kimura BJJ From Back Control
Most grapplers reach for the rear naked choke first, then panic-search for a kimura when the choke gets defended. Reverse the order. When the opponent shells up and clamps their chin to defend the strangle, their elbows usually expose themselves on the side opposite the choking hand. That’s a free kimura grip.
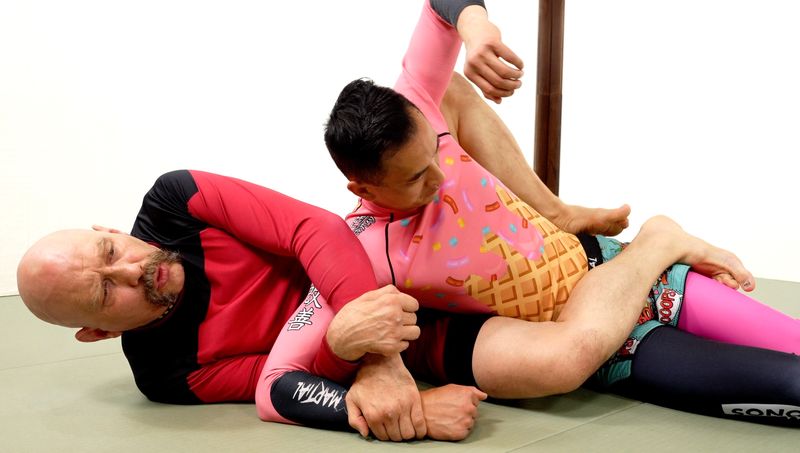
Finishing requires rotating off the back into a side-belly position — you can’t crank a kimura while still chest-to-back. The Ruotolo brothers, Mikey Musumeci, and Kade in particular have used this back-to-kimura transition repeatedly in ONE Championship matches when the opponent defends the strangle by trapping the choking arm. If the kimura doesn’t finish, the rotation almost always feeds you a body-triangle armbar or a return to the back with hooks back in.
Setup 7: T-Kimura — The Control Position
The T-Kimura is the position where you sit perpendicular to a downed opponent, kimura grip locked, body forming a “T” against theirs. It is not just a submission attempt. It is a launching pad for back takes, armbars, leg attacks, and crucifix entries — all controlled from the same grip.
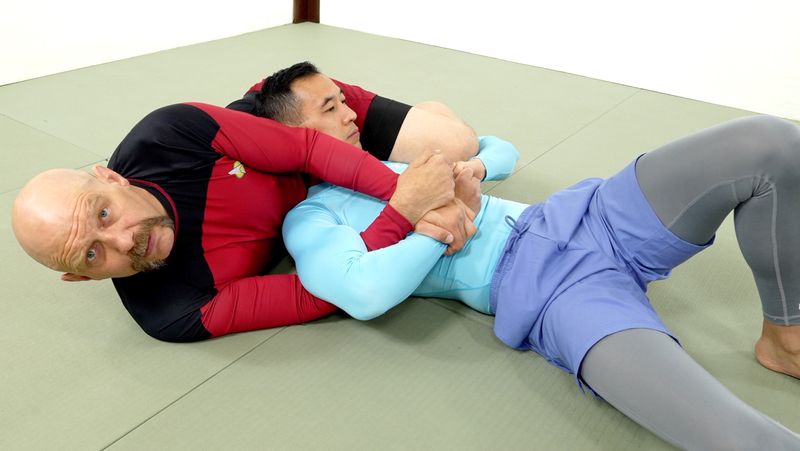
This is the framing that turned the kimura from a “white belt submission” into a Danaher Death Squad staple. Once you’re in the T position, the opponent has four exits: roll toward you (back take), roll away (sweep), straighten the arm (armbar entry), or invert to escape (leg attack opens). You don’t pick the exit — they do. You just have the answer pre-loaded for each one. That’s the difference between hunting a single tap and running a system.
Americana vs Kimura — When to Switch
The americana vs kimura debate isn’t really a debate. They’re the same lock in opposite directions. The americana cranks the hand toward the opponent’s hip with the elbow bent at 90 degrees. The kimura cranks the hand toward the opponent’s head with the elbow bent the other way. The grip is identical — only the rotation changes.
The practical rule for no-gi: if the opponent’s arm is above their shoulder line and bent, the kimura is closer. If it’s below the shoulder line and pinned, the americana is closer. Strong grapplers learn to flow between them based on which way the opponent fights the wrist. In a sweat-soaked roll, the kimura usually wins because the figure-four grip survives the slip better than the americana’s straight wristlock. If you’re chaining off side control or mount, train both rotations from the same starting grip. The setup time you save by not regripping is worth more than any single submission’s standalone success rate.
Drilling the Kimura BJJ System in No-Gi
One drill changes more about your kimura game than any instructional. Start in side control with the figure-four already locked. Have your training partner pick any one of four defenses — bridge-and-roll, straighten-the-arm, hide-the-elbow, or turtle-up. Your job is to recognize the choice and transition to the corresponding attack within two seconds: armbar for the straight arm, back take for the turtle, sweep ride for the roll, north-south reset for the elbow hide.
Run that for ten minutes a week and the kimura stops being a submission you “try for” and starts being a hub you operate from. Pair it with focused study on a related no-gi attack like the darce choke — the front-headlock entries off a failed kimura clear feed straight into darce setups — and the heel hook system for when opponents invert away from your top pressure. Submissions that connect to other submissions get more taps than the ones you isolate.
Watch how high-level no-gi grapplers approach the kimura the next time you stream an ADCC trial or a WNO card. They don’t chase the tap. They use the grip to extract the better position the opponent gives them when they panic. The figure-four wins more matches as a steering wheel than as a finisher. Lock the grip, follow the opponent’s escape, and let them pick which submission they’d rather lose to.
YouTube: 9 Must-Know Kimura Attacks
For a full visual breakdown of the attack chains discussed above, the TRITAC Martial Arts channel covers nine kimura applications across guard, side control, north-south, and back exposure — the same positional grid the no-gi kimura system runs on.
Sources
- The Kimura Roadmap — Grapplearts — Stephan Kesting’s positional map of kimura entries across guard, half, side, north-south, and back
- How to Bait and Finish Someone With a Kimura From Half Guard — ADCC News — Half-guard kimura trap mechanics
- The Complete Guide to BJJ Kimura — Kingz — Grip mechanics and historical background of the figure-four lock
- 2026 ADCC World Championship — FloGrappling — Reference point for current elite no-gi competition
- Kimura Jiu Jitsu Instructionals — BJJ University — Compiled instructional video library
Browse our top-rated rashguards and no-gi gear at the RashguardGuy shop →