Guillotine Choke: 7 No-Gi Variations That Finish Fast
The guillotine choke has finished more high-level no-gi matches in the last decade than any other front-headlock submission, and it stays popular for one reason — it works when nothing else does. Charles Oliveira owns the UFC submission record largely because of his guillotine. Marcelo Garcia stacked four ADCC golds on a version of it that he basically invented. The truth is, most white and blue belts misuse the guillotine because they treat it as one move when it is really a family of three distinct chokes with three different finishes.
This guide breaks down the guillotine choke for no-gi — the high elbow, the arm in, the standing snap-down version, and the mounted finish that ADCC competitors live and die by. Every section answers a real question instead of repeating the same generic “tuck your chin” advice you have read on every other BJJ blog.

Why the Guillotine Choke Dominates No-Gi BJJ
The guillotine choke shows up more often in no-gi than in gi for a specific reason — no cloth grips means more scrambles, more head-down posture, and more chances for one fighter to over-commit on a takedown. Sprawling on a bad shot or catching a head-down passer puts the front headlock right in your hands. From there, the guillotine is two seconds away.
The math is hard to argue with. According to a FightMatrix breakdown of UFC lightweight submissions from 2010 through 2024, guillotine variants accounted for roughly 18% of all submission wins in the division — second only to the rear-naked choke. In sub-only no-gi events like Submission Underground and WNO, the percentage climbs higher because matches reward aggressive scrambling and front headlock entries.
The submission also scales across body types. A 130-pound competitor with long arms can finish a 200-pound training partner using the same mechanics that worked for Marcelo Garcia, who finished much larger ADCC opponents the same way. That portability is rare in BJJ. The triangle choke punishes short arms. The arm-in heel hook punishes short legs. The guillotine just asks you to be patient with your grip.
How the Guillotine Choke Actually Works
A real guillotine is not a neck crank, and that distinction matters more than most coaches teach. The pressure goes into the carotid arteries on both sides of the trachea, not into the windpipe itself. When your forearm bone — specifically the smaller, sharper end near the wrist — sits across the side of the neck, blood flow to the brain drops within four to six seconds. That is the tap window.
Three pieces have to be right or you are just hugging a head:
- The blade of the forearm — not the meaty inside, not the elbow joint, the bony edge near the wrist. This is the part that bites.
- The opponent’s chin position — their chin must be tucked under your forearm, not pinched between your bicep and forearm. A chin trap is a neck crank, not a choke, and it usually slips.
- Your hand height — your finishing hand should drive up toward your own opposite ear, not down into the opponent’s spine. The vector is up and into your chest, not back.
Grapplearts’ Stephan Kesting, who has been breaking down the technique for over twenty years, calls the choking-hand grip the “single most stolen detail in BJJ” — the lower-ranked grappler who finally fixes it usually starts tapping people two stripes above them. His full breakdown is worth reading before your next session.
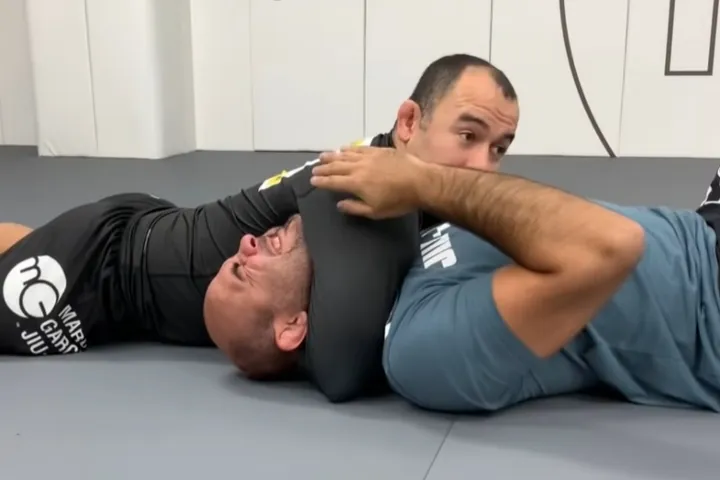
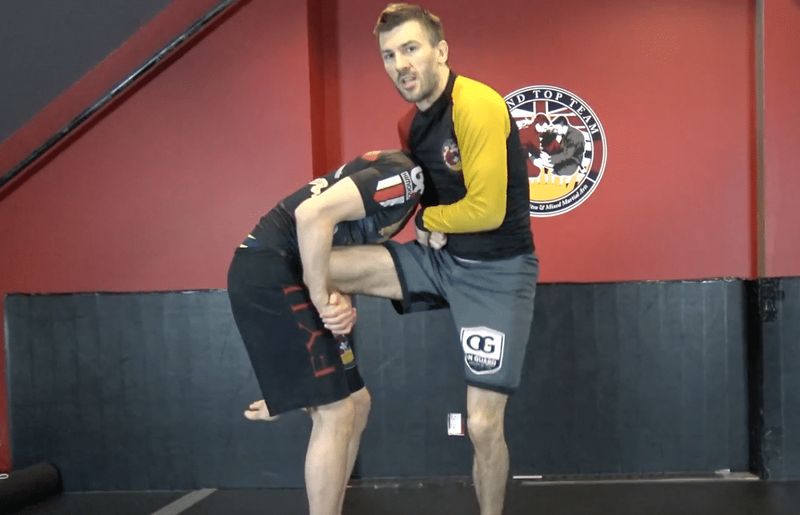
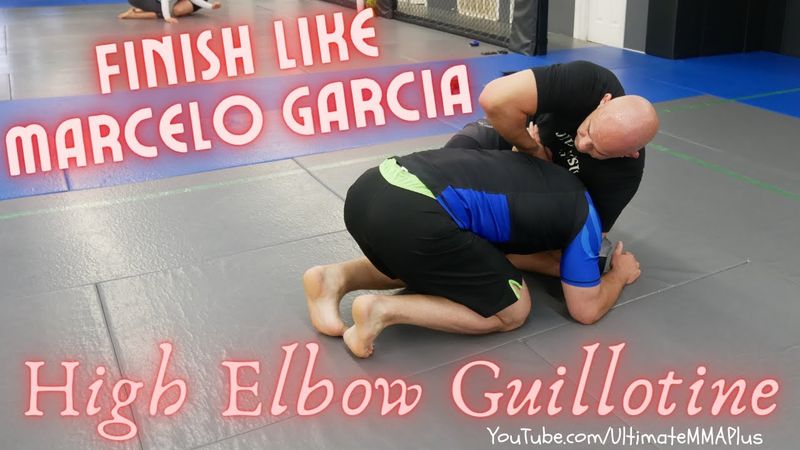
High Elbow Guillotine: The Marcelotine Method
The high elbow guillotine — nicknamed the Marcelotine after Marcelo Garcia — is the version every modern no-gi player needs in their toolkit. Garcia popularized it in the mid-2000s ADCC era when opponents started defending the standard arm-in guillotine by stuffing the head against the chest. He fixed the problem by lifting his choking elbow over the opponent’s far shoulder instead of trapping it underneath.
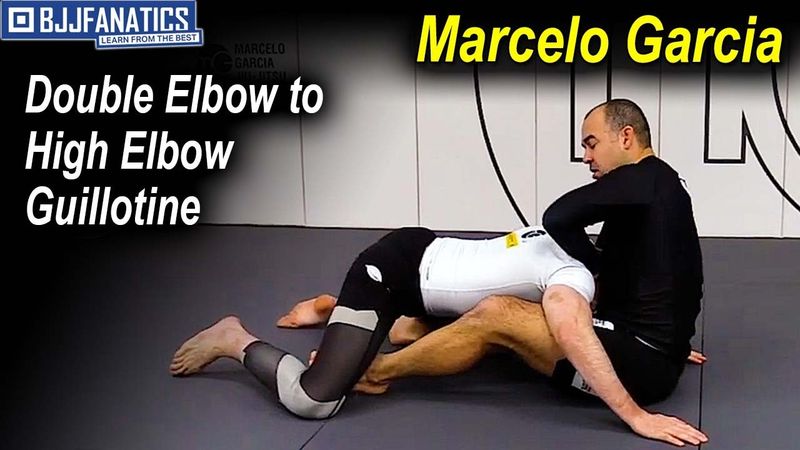
The mechanic that separates the high elbow from every other variation is the elbow pointing toward the ceiling. The choking arm wraps the neck so that the elbow rides above the trapezius muscle on the far side. Your wrist bone slices into the carotid. Your opposite hand grabs the meaty area between your wrist and pinky — not the fingers, never the fingers. From there, you lift up toward your chin and tuck your knees to your chest. The legs barely move. The finish is a chest squeeze, not a leg extension.
The high elbow version trades two things for one. You give up the option to transition out — once your elbow is over the shoulder, you are committed and the opponent knows it. In exchange, you get a tighter bite on the carotid and a much harder time for them to peel your wrist. BJJ Fanatics’ analysis notes that the high elbow finishes about 30% faster than the arm-in version in instructor-recorded reps, because the bite is purer and the opponent cannot turtle out to safety.
If you are coming up through no-gi and want one version to drill 500 times before adding others, the Marcelotine is the answer. It is also the variation that pairs naturally with Marcelo’s North-South choke system, which uses identical hand mechanics from the other side of the body.
Arm In Guillotine: When to Use It and When to Bail
The arm-in guillotine catches the opponent’s near arm along with the head. It looks easier — you just close down the loop — but the choke itself is harder to finish because the trapped arm acts as a shock absorber between your forearm and their neck. The tap window stretches from six seconds to fifteen or twenty.
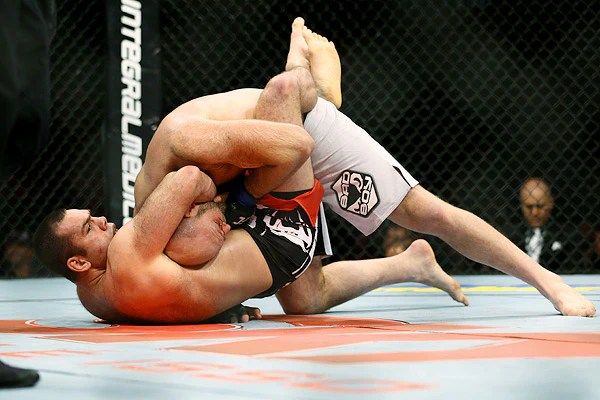
The arm-in earns its keep in transition. If you catch a sloppy single-leg attempt, you usually trap the shooting arm before you can clear it — fighting to free the arm gives them time to stand back up. Closing the arm-in lets you go to the ground in mount or side control and finish from there. Charles Oliveira has built half of his UFC submission record on this exact sequence: catch the head, trap the arm, sit to closed guard, finish with the legs.
The bail-out rule is simple. If you cannot get the arm-in version finished within 20 seconds and the opponent has flattened their posture, switch to a back take. The trapped arm gives you a free path to the back from mount. Trying to hold a stuck arm-in for 90 seconds is how you gas your forearms and lose the next round.
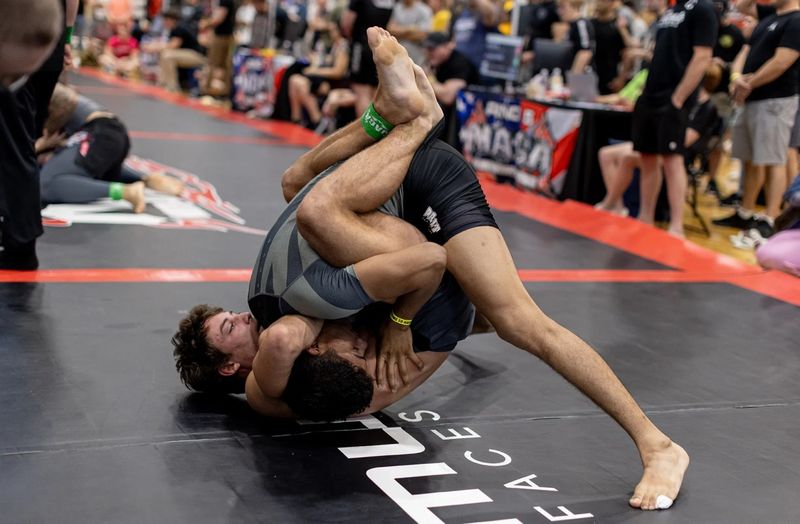
Guillotine Choke From Guard: The Closed-Guard Setup
The closed-guard guillotine is the first variation most BJJ schools teach because it forgives terrible posture and bad grip. From your back with the opponent posted up in your closed guard, the entry comes off a hip bump fake. You shoot your hand to the mat as if you are sweeping. They post their arm to stop the sweep. Their head dips forward. The guillotine is right there.
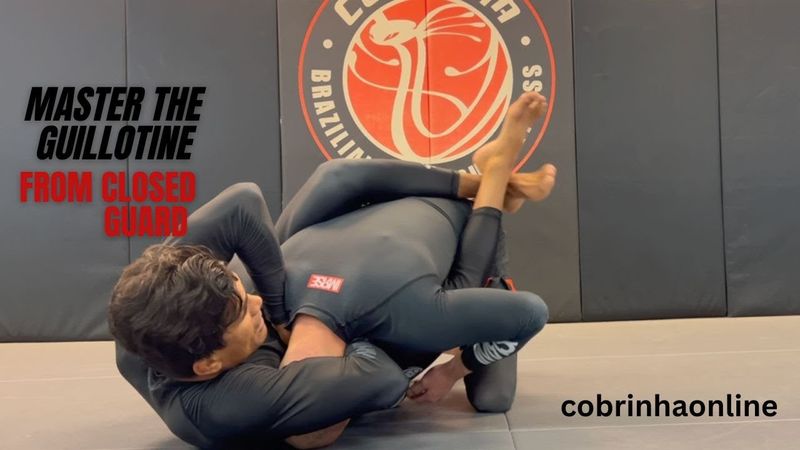
The finish from closed guard adds something the standing version cannot — the legs. Once your grip is set, you uncross your ankles, open the guard, and shoot your hips forward into their chest as you pull up. This creates a wedge that traps their shoulders in front while your forearm cuts up into the neck. Most coaches teach the leg extension wrong here. The pressure should drive their chest away from your hips, not just up. Your hips should hunt the floor under their armpit, not their stomach.
Cobrinha — four-time IBJJF World Champion and one of the cleanest guillotine technicians in modern BJJ — walks through the closed-guard version above. Watch how little he extends his legs. The work is in the chest squeeze and the upward wrist drive.
Standing Guillotine: Catching Sloppy Takedowns
Standing guillotines win matches in the first ten seconds. Charles Oliveira finished Clay Guida in 41 seconds at UFC 100 with this exact entry — Guida shot a single-leg, dropped his head, and Oliveira snatched the front headlock without breaking his base. Nate Diaz did the same to dozens of opponents before the rear-naked choke became his signature.
The trick to the standing version is the sprawl-and-recapture. As your opponent shoots, you kick your legs back to break their grip on your legs. Their head is now buried in your chest. From there you have a one-second window before they stand back up. Slide your choking arm under the chin, lock your hands, and step around — not back. Walking your feet to the side lets you arc your weight into their neck and cut the choke without losing the front headlock if they manage to stand up.
Most standing guillotines fail because the puller leans back instead of arching their chest forward. Leaning back puts the pressure on their forehead. Arching the chest puts it on the carotid. Drill it slow until the chest-up reflex replaces the lean-back reflex.
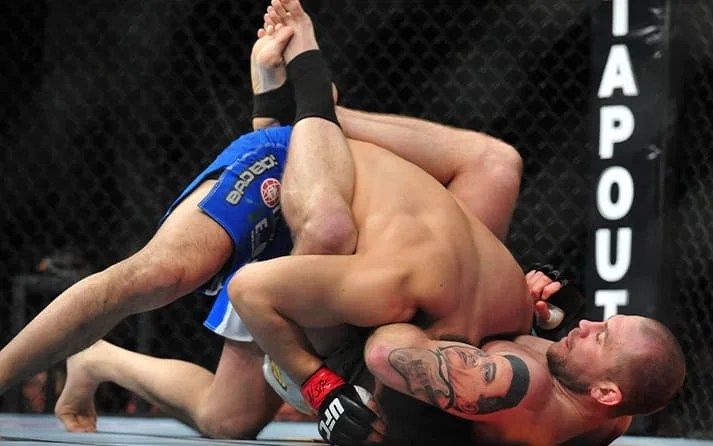
Mounted Guillotine: The Finish Position That Forces the Tap
If you catch the guillotine standing or from the front headlock and ride it to the ground, the next position is mount — not closed guard. Mount finishes the guillotine faster than any other position because the opponent cannot use their legs to bridge or shrimp out. Their hips are pinned. Their arms are stuck under their own head. The choke does its job in seconds.
The transition from front headlock to mounted guillotine looks risky to lower belts because you have to give up the front headlock briefly to swing your leg over. The risk is overstated. If your choking grip stays locked while you step, the opponent cannot escape during the swing — their head is still trapped. Practice the swing slow at first. After 50 reps your hips remember it and the move feels effortless.
The mounted version pairs cleanly with the kimura from mount as a backup — when the opponent peels your wrist, the same arm is already in position to attack the kimura. Both submissions chain because they share the front-headlock origin.
Guillotine Choke Defense: How to Survive
Defending the guillotine has two phases — prevention and escape. Prevention is the easier one. Keep your chin glued to your chest the moment your head crosses your opponent’s centerline. The moment your chin lifts, you are vulnerable. Coaches who film their students often spot the same mistake — the head lifting one inch as the shooter chases the takedown — and that one inch is the difference between a clean double-leg and a 12-second tap.
If the choke is already locked, escape depends on the variation. Against an arm-in guillotine, drive your trapped shoulder into their throat and walk your hips to the choking-arm side — this strips the bite and opens a back take. Against the high elbow, do not waste energy bridging straight up. Roll your head toward their armpit and post your free arm on their hip to spin out. The Evolve MMA staff has a clean escape sequence written up here if you want the visual breakdown.
The third rule — and the one most people skip — is to never panic-tap to a guillotine that has not yet cut the carotid. Many guillotines are crank attempts that hurt the jawline but cause no actual blood-flow problem. If your neck hurts but your vision is normal, you have ten more seconds to escape before any real damage. Use them.
Common Mistakes That Cost You the Tap
Five errors show up in almost every gym’s white-belt rolls. Fix these before adding fancy variations:
- Choking with the bicep instead of the wrist. The meaty muscle of your inner arm is soft. The wrist bone is sharp. The hand-grip placement decides which one cuts.
- Pulling down instead of up. Down crushes the trachea and gets you a knee-bar to the face. Up cuts the blood and forces the tap.
- Holding the guillotine open-guard for more than 20 seconds. If they have flattened your hips, you are losing the position and they are escaping. Switch tracks.
- Standing up to a hip-up guillotine. Standing gives the defender mat space to rotate out. Stay on your back. The closed guard is your finish lock.
- Forgetting the head angle. Tilt their head slightly toward their open-side shoulder before the squeeze. A straight-on guillotine slips. An angled one taps every time.
Drilling Plan: Build a Guillotine That Finishes
The fastest way to build a real guillotine game is volume. Pick one variation — the Marcelotine is the smart starting point — and drill it 50 reps a session for two weeks. Then add the closed-guard entry. Then the standing snap-down. After six weeks, you will catch one in live rolling without thinking, and that automatic catch is the only metric that matters. If your no-gi training plan does not include a front-headlock segment twice a week, you are leaving the highest-percentage submission in BJJ on the table.
Roll with a partner who actively defends. A cooperative drill where they sit there and let you finish does nothing for your live attack. Your training partner should fight the grip, post on the hip, and try to escape every rep. That friction is what builds a guillotine that works against a real opponent at a real competition.
Sources
- BJJ Fanatics — Arm In Guillotine vs High Elbow Guillotine (Marcelotine) — technical breakdown of the two main variations from Marcelo Garcia’s system.
- Grapplearts — The Ultimate Guide to the Guillotine Choke in BJJ — Stephan Kesting’s grip and angle breakdown.
- Evolve MMA — BJJ 101: The Guillotine Choke — fundamentals and escape mechanics.
- FloGrappling — A Closer Look at Jiu Jitsu Chokes — context on how the guillotine fits into the broader choke family.
- UFC.com — Charles Oliveira’s Career Highlights — submission record and guillotine finishes in the UFC.
Browse our top-rated rashguards and no-gi gear at the RashguardGuy shop →